 I think this front page of the Q magazine has a bit of a retro feel too it, mainly because of the style of clothes the man is wearing, but I think that the writing on the page looks quite modern. The target audience of this magazine is for people of many different ages as the content the magazine provides varies from various festivals up and coming and many different interviews from different bands. It targets lots of different people because of the variety of genres of music that are talked about in the magazine. I think the age at which the magazine targets are any age because I think in this day and age many younger people have their own music tastes so they like various types of music and this magazine compliments that well. The title is located at the bottom left of the front page it works well because the portrait takes up most of the page so it is out of the way and not taking too much of the page but it also stands out as the colours don’t clash so it stands out from the black on his top, the words are effective using his name to make readers know who he is, and the words underneath; ‘Then.Now.Tomorrow…’ they are used well because they draw readers in and it makes you want to read more because of the ellipses at the end of tomorrow which means there’s something more to come as in the man is making a comeback or he’s doing something new in his career. The colours used on the front page are similar to the logo but they are quite plain colours and again it relates to the image as the colours on his top are plain and the same colours that are used on the text and i think this works quite well because then there isnt too many different colours which could distract you from the picture or the writing.
Monday, 21 November 2016
magazine research
I think this front page of the Q magazine has a bit of a retro feel too it, mainly because of the style of clothes the man is wearing, but I think that the writing on the page looks quite modern. The target audience of this magazine is for people of many different ages as the content the magazine provides varies from various festivals up and coming and many different interviews from different bands. It targets lots of different people because of the variety of genres of music that are talked about in the magazine. I think the age at which the magazine targets are any age because I think in this day and age many younger people have their own music tastes so they like various types of music and this magazine compliments that well. The title is located at the bottom left of the front page it works well because the portrait takes up most of the page so it is out of the way and not taking too much of the page but it also stands out as the colours don’t clash so it stands out from the black on his top, the words are effective using his name to make readers know who he is, and the words underneath; ‘Then.Now.Tomorrow…’ they are used well because they draw readers in and it makes you want to read more because of the ellipses at the end of tomorrow which means there’s something more to come as in the man is making a comeback or he’s doing something new in his career. The colours used on the front page are similar to the logo but they are quite plain colours and again it relates to the image as the colours on his top are plain and the same colours that are used on the text and i think this works quite well because then there isnt too many different colours which could distract you from the picture or the writing.
Studio shoot
We went and did a shoot in the studio at college, we did this to explore the ideas of high key and low key lighting, high key is using lights all round the subject so they are well lit up and it produces a clear image, low key lighting is when there is very low light around but there is a light that you use to focus on the image but because there isn't much light surrounding the subject you use the light at different angles to give a very interesting affect and create lots of shadows.


Wednesday, 16 November 2016
Portrait shoot proposal
The Portrait Shoot Proposal:
For my shoot I will be taking pictures of my little brother pulling a variety of different of facial expressions poses and his hands to pull interesting and funny faces, I am using him for my shoot because I feel I can work easily with him and he will be cooperative, but also he will be a good fit for my work as he can be expressive through his face which fits with the project. I will be shooting it in some sort of field or forest, a wide area of land which is open at about the time of when the sun is setting because the back drop will make it an interesting end product, but also I will do a second shoot which will be shot inside in a surrounding which will show what he is like and what he is interested in. On my camera I will be using a long lens with a focal length of 55-300mm and I will use either 200 or 300mm to get the quality on my brothers face and the smaller 55mm for the 3 quarter body shot. and I will be using natural light from the sun and maybe the moon depending on the time of day but if the light is not enough during the night I will use flash to capture him. I will use a tripod as my camera will be zoomed in so it won’t be as stable if I hold it on its highest focal length. My work has been inspired by Irving Penn, I feel his work really captures the facial expressions and emotions the person is feeling, in some of his pictures he gets his subjects to hold and pull part of their face which makes an interesting look on the person. I think that idea is quite interesting I think I will be taking his work and incorporating them into my own work. The target audience for my magazine will be for teenagers about the age of my brother at 12/13 years’ old.
For my shoot I will be taking pictures of my little brother pulling a variety of different of facial expressions poses and his hands to pull interesting and funny faces, I am using him for my shoot because I feel I can work easily with him and he will be cooperative, but also he will be a good fit for my work as he can be expressive through his face which fits with the project. I will be shooting it in some sort of field or forest, a wide area of land which is open at about the time of when the sun is setting because the back drop will make it an interesting end product, but also I will do a second shoot which will be shot inside in a surrounding which will show what he is like and what he is interested in. On my camera I will be using a long lens with a focal length of 55-300mm and I will use either 200 or 300mm to get the quality on my brothers face and the smaller 55mm for the 3 quarter body shot. and I will be using natural light from the sun and maybe the moon depending on the time of day but if the light is not enough during the night I will use flash to capture him. I will use a tripod as my camera will be zoomed in so it won’t be as stable if I hold it on its highest focal length. My work has been inspired by Irving Penn, I feel his work really captures the facial expressions and emotions the person is feeling, in some of his pictures he gets his subjects to hold and pull part of their face which makes an interesting look on the person. I think that idea is quite interesting I think I will be taking his work and incorporating them into my own work. The target audience for my magazine will be for teenagers about the age of my brother at 12/13 years’ old.
Tuesday, 15 November 2016
Portrait- Task 1a lens research
In this post i will be discussing the different types of lens that can be used in photography.
Prime lens: A Prime lens is a lens that has a fixed focal length, this means that the lens wont zoom in or out, The most standard prime lens is the 50mm “normal lens.” Its focal length roughly matches where your eye focuses, giving you an image that’s nearly the same as to what’s in front of you. a prime lens can give you a higher quality image, the design is much simpler because its not made to zoom, so this means it will have fewer visual defects. The downside of using a prime lens is that it doesn't change focal length so you cant zoom in on things or zoom out of the subject.
 Photo by Christopher O’Donnell.
Zoom lens: A lens allowing a camera to change smoothly from a long shot to a close-up or vice versa by varying the focal length. these are usually kit lenses, it can zoom from a wide angle shot up to a telephoto lens with a focal length of 18-55mm or up to 75mm. the zoom lens is good because you can use it in many different situations, at 18mm it is a wide angle lens so it is good for landscapes architecture but at the other end at 55mm is good for portrait photography.
 This was taken by Steve McCurry
Wide Angle lens: A wide angle lens is a lens which has a smaller focal length than a normal lens, which is about 35mm, a wide angle or ultra wide angle lens is used to photograph a big scene, to capture a smaller scene in a limited amount of space. A disadvantage o f using a wide angle lens is that the images come out distorted and it makes it look like the image is curving in on the middle point.


Portrait lens:
Prime lens: A Prime lens is a lens that has a fixed focal length, this means that the lens wont zoom in or out, The most standard prime lens is the 50mm “normal lens.” Its focal length roughly matches where your eye focuses, giving you an image that’s nearly the same as to what’s in front of you. a prime lens can give you a higher quality image, the design is much simpler because its not made to zoom, so this means it will have fewer visual defects. The downside of using a prime lens is that it doesn't change focal length so you cant zoom in on things or zoom out of the subject.
Photo by Christopher O’Donnell.Zoom lens: A lens allowing a camera to change smoothly from a long shot to a close-up or vice versa by varying the focal length. these are usually kit lenses, it can zoom from a wide angle shot up to a telephoto lens with a focal length of 18-55mm or up to 75mm. the zoom lens is good because you can use it in many different situations, at 18mm it is a wide angle lens so it is good for landscapes architecture but at the other end at 55mm is good for portrait photography.
This was taken by Steve McCurryWide Angle lens: A wide angle lens is a lens which has a smaller focal length than a normal lens, which is about 35mm, a wide angle or ultra wide angle lens is used to photograph a big scene, to capture a smaller scene in a limited amount of space. A disadvantage o f using a wide angle lens is that the images come out distorted and it makes it look like the image is curving in on the middle point.
This was taken by Ken koskela
Telephoto lens: A lens that has a longer focal lens than a standard lens giving a narrow field of view and a magnified image. lenses with a focal range of 100mm or above are classed as telephoto. a telephoto lens is used to capture and keep an image in focus when shooting images far away or they can be used well in portrait, a disadvantage of using a telephoto lens is when your focal length is at its highest the stability becomes a problem so it is hard to control, use a tripod for this.
This photo was taken by Andrew Gibson
Standard lens: A standard lens is one that usually comes with the camera also known as a kit lens, the focal length is normally about 18-55mm, this gives a field of view similar to the naked eye. which gives an image a more natural feel. they are a good overall lens which can be used for landscapes, portraits and as they have a wide aperture it is good for indoor and low light photography.
Portrait lens:
Wednesday, 19 October 2016
Final Evaluation
Final Evaluation.
I think Overall this Project was a very interesting and quite a fun project, Throughout this project my understanding of not only camera lenses, how they work and different techniques you can do with them and my understanding of portraits and how best to take them has been broadened, My idea was to take my final photos in a spooky or scary environment, so i went to three different locations, An old Mental institute which is called High Royds, then to Menston cemetery and then to Guiseley cemetery. i used these locations because they were all spooky places, cemetery's because of the obvious reason that people get buried there and i think the look of gravestones look quite spooky but also really interesting, High Royds is notoriously a spooky and weird place to be so i thought it was a perfect place to go and shoot my finals, it cost nothing to get there as they were a 10 minute walk away from where i live. i enjoyed going to the studio in college and experimenting different techniques and the results were really good, i enjoyed the low key and the high key shoots in the studio because it felt like we were proper photographers in a real situation. I liked the different types of shoots we had to do such as the contre jour shoots which gave an interesting end product. I've not really been interested in portrait photography but after this project it has really opened my eyes to what its really like and i think portrait photography could be something id like to do and pursue. I personally think my final images worked really well and there was a few things i would have done better if i did it again such as changing what my subject was wearing and maybe doing a few more shoots but in different locations. My inspiration for the project was Steve McCurry and next time i am to do something like this i think he will influence my work again but the next time i will take more of his ideas and put them into my own work because i like his style of work. i think i could have organised my time a bit better by going out days when i had little work to do and to do this i would have to do my work as soon as it is set so it is out of the way. But overall i believe this project was a success as it really expanded my knowledge of lens and different lens based imagery and also portraits in general and what best to do on photo sets or in a studio,i enjoyed this project a lot and i would be interested in doing more portrait photography in the future.
Analysis of my Finals
Analysis of final images:
Throughout this project the aim was to create portrait photos that capture the subjects emotions and facial expressions to create an interesting front cover and double page spread for Sunday supplement magazine. The idea behind my images was to shoot them in scary or creepy places.


 This photo caught my attention because it is mysterious in the way that the grave stone stands out a lot which gives it a dark feel too it and the brightness of the whole photo adds to that as well, i think that the pose that he is stood in works quite well as its quite a normal look but with his hands in his pockets and his hood up it makes it look like he is a bit more tough and scary. i edited this photo slightly in Photoshop by changing the levels of it so it looks darker and just a bit more mysterious. i used flash on this image and i think it worked well because the grave stone is lit up well but not too much so it doesn't draw your attention away from the main subject which is my brother, it was shot on a focal length of 18mm which means that i could capture the whole idea and frame in the photo easily.
 This image was used as my final double page spread and i is my favorite photo out of all my finals because i like the way he is posing in this one it makes him look like quite an interesting character, paired with him wearing black gloves and his hood up i think he is kind of showing what the youthful population are like, again with the moon in the background i think it adds to it because it makes it look interesting by adding to the feel of the dark night and it stands out to me even tho it is so small still. i think the colour of his jacket works well by contrasting with the colour of the grass and the background, but if he had been wearing a darker colour jacket he would have added to the dark feeling of the picture.
 This image is the one i used for my front cover, i edited it in Photoshop to make the background darker so the subject would stand out more, also i upped the contrast a little so the colours would seem more vibrant on him. to me this image works well as a front cover because the subject is clear and it works well with my idea of being in dark and scary places, the only downside to my shot is the way he is stood, if i had told him to stand in a different position or pose i think the end result would have been better.
I believe my project was a success since the idea that i had worked well and the final images that i managed to get were good, if i was to change anything for my final shoots i would have the subject wearing all black to add to the darkness feeling of my idea and also have the subject doing different poses or expressions.
Throughout this project the aim was to create portrait photos that capture the subjects emotions and facial expressions to create an interesting front cover and double page spread for Sunday supplement magazine. The idea behind my images was to shoot them in scary or creepy places.

This image caught my attention because of the facial expression on the subject is quite funny but shows off how you would feel in the location it was shot which was an old mental institute, i think this image worked well because of my idea to shoot images in dark scary places and capture the subjects facial expression was good. Because i was shooting in low light areas i used artificial light which was flash to light up the subject which worked well because it contrasted with the dark background, i used Photoshop a tiny bit to change the levels of the dark areas to make the subject stand out more from the background, the image was shot on a focal length of 155mm which focuses the subject and makes the background blurry but with it being a a dark background it is hard to tell.

I like this image because it has a very interesting and creepy vibe to it, first off it was shot in a graveyard and it really caught my attention because when i saw the location i knew it would make a good photo, although it is barely visible i think the moon in the background of the image really adds to the image because of the darkness of the background it stands out even tho it is quite small, also the fact that it was a full moon adds to the scariness because a full moon is usually portrayed in films and TV programmes as if something scary is going to happen. I shot this image on a focal length of 18mm and i used flash to light up the scene of the image, there is a perspective element in the this photo because of the angle at which the graves are shot at. i think one downside to this image is the subjects clothes, if he had been wearing all black i think it would have looked better so if i was to go and try this again i would make him wear all black to make him look scarier.

This image was taken up close and it focuses quite well on the subjects face but it isn't too zoomed in, it is a head and shoulders portrait and i think it worked well because his face is sharp and the background is fairly out of focus which means he stands out more which is giving it a differential focus look, again the image was shot on a focal length of 18mm which creates a wide angle look i think, i used flash to light up the subjects face because the area was a dark one again. i think the subject stood out quite a lot because of the light colours of his jacket and the dark colours of the hedge and gate behind him contrasted well, through his facial expression you can tell he was scared and that is the kind of look i wanted to get from him, my one concern and its a small one is the hood on his jacket isn't straight which looks quite annoying to me but if i was to do it again i would make sure it is even on both sides.


I believe my project was a success since the idea that i had worked well and the final images that i managed to get were good, if i was to change anything for my final shoots i would have the subject wearing all black to add to the darkness feeling of my idea and also have the subject doing different poses or expressions.
Tuesday, 4 October 2016
Analyzing My Photos.

In this picture (above) my subject was the tree by itself with the rest of the forest behind it, i used fill in flash on this photograph because the foreground and front of the tree was to dark so i used it to light it up. i used the rule of thirds for this as the tree is a third in to the right and it is the main subject,in the foreground there is the main subject which is the tree and in the background is a lot of trees, the tree shot in the foreground is effective because it makes it look like a lonely tree by itself. it was taken in the chevin forest and i liked it because the tree gives it more effectiveness as it is by itself. it was taken during the day about 2 o clock, it works with the project because it is a place where people would visit more in the summer and the leaves show summer as they area vibrant and green unlike in the autumn. i like this photo because of the loneliness of the tree at the front, i think it worked well but it looks slightly blurry.


Wednesday, 14 September 2016
In The Summertime
Research task:
To create a silhouette first off you need a subject, something thats preferably distinctive and has a cool shape about it, then position your subject or make sure you're taking the photo looking towards the light source, without flash firing you will need to almost trick your camera into exposing the wrong thing, so focus your camera on the brightest light in the picture and hold it down half way. then move it back to your subject with your finger still half way down on the shutter and it should come out the subject all black and the background lit up.


This Diagram shows how a reflector works, the sun looking onto the back of the subject would create a silhouette but using a reflector it would put light back onto the subject at the front.


Fill in flash is a photographic technique used to brighten the deep shadow areas,typically outdoors on sunny days, though the technique is useful any time the background is significantly brighter than the subject of the photograph, particularly in backlit subject. it is done by using flash on pictures that are backlit by any light source, if you shoot a picture at someone with a bright light behind them it will usually create a silhouette so you use the flash to put the light back into the image at the front.

To create a silhouette first off you need a subject, something thats preferably distinctive and has a cool shape about it, then position your subject or make sure you're taking the photo looking towards the light source, without flash firing you will need to almost trick your camera into exposing the wrong thing, so focus your camera on the brightest light in the picture and hold it down half way. then move it back to your subject with your finger still half way down on the shutter and it should come out the subject all black and the background lit up.

This image was taken by Saravut Whanset.
Reflectors are used to manipulate light by providing another surface for light to bounce off, it is mainly used in portrait photography as its main purpose is the fix shadows in the photos, If the light is directly behind the subject, using a reflector directly in front of the subject will help prevent a silhouette.

The time of day can affect the photographs you take because lighting shadows and colours can all be different throughout the day. For example in the morning the sun is not shining directly overhead which means light is diffused and most likely coming from all directions. This helps your subject have even more light and have a better overall exposure because the contrast between the dark and light areas aren't the same unlike what happens later on in the day.
The morning light can enhance the vibrancy and colors of your images but later in the day there’s higher contrast between dark and light areas. and for sharper shadows and more available light its better to shoot later in the day.
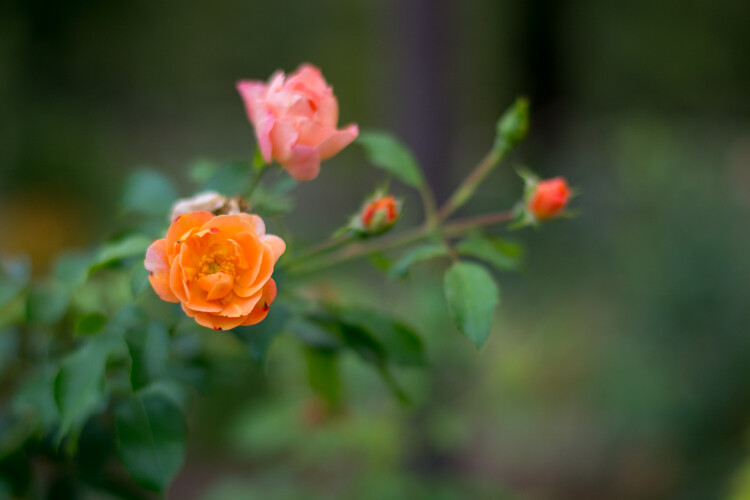
This was taken at 7:30am in the morning
This is the same flower picture but at 1:45pm
As you can see the two pictures are different in colour and vibrancy. the first one the orange colours are more vibrant and stand out more, the shadows in the later picture you can see that the shadows are more harsh made from the leaves.
Depth of field is the distance between the nearest and furthest objects giving a focused image.
The bigger f number on your camera which is a smaller aperture means that you will get a larger depth of field, e.g if the aperture is at f11 then the depth of field is larger whereas if i the aperture is at f2.8 the depth of field is smaller. If the depth of field is smaller then the area at which will appear focused on your image will be a lot shorter so to focus the full subject then the aperture will have to be a smaller f stop.
Maximum depth of field is when the full subject,foreground and background are in focus, you achieve this by focusing on the middle point or the hyperfocal distance instead of the infinity point and use a small aperture and a wide angle lens will help you achieve the photo.
This diagram for depth of field shows how it works, the smaller aperture number or f stop means the smaller the depth of field so in the diagram the aperture is at f/2.8 and the depth of field just focuses on the animal on the box whereas the aperture at f/5.6 is showing the two animals in focus, then the final aperture at f/11 shows the full image in focus.
In photography lighting is key and understanding lighting will mean the shots you take are better because you will have the right lighting for ever situation. There are three types of lighting in photography, natural which is light made from natural sources like the sun the stars and the moon. this can affect your photographs because depending on where the sun is in the day it can effect the shadows on your subject, with direct sunlight the contrast on the subject will be higher and it will have a warmer look, whereas if the sunlight is diffused then it will have a low contrast and it will have a cooler look to it meaning the colours will be darker and not as vibrant.
Artificial light is light made by humans like fires candles and electrical light is a form of artificial light such as street lights and torch lights.
Ambient light is the 3rd type of light, this is the man made background light all around us, it is used to soften any contrast brightly lit areas and their surroundings.
in the image on the left the the subjects face is barely visible due to the light in the background creating a slight silhouette so the fill in flash is used to lighten up the subject so it has an overall contrast.
Subscribe to:
Posts (Atom)